Sunday, 29 June 2014

Recipe: Cherry Pie, Chocolate Tart, Super Simple 5 ingredient BLISS!


This is the kind of recipe that’s I love writing about, those little triumphs in the kitchen that can really take the edge off a crappy day. Not just the relaxation and distraction of creating, but the “phoenix from the ashes moment” of having created something really very nice out of leftovers (and bits and things).

After the the supper club last week we had some left over cherries, I’d bought a box to go with the petit fours:


I new I’d have a busy week ahead, and I could just imagine them, the following Saturday, in the same bowl on the kitchen table, with a giant bloom of mould growing on them. So I had a look around the kitchen this is what I found: mascarpone cheese, a roll of flaky pastry, and a lemon.

Well pastry screams PIE (and smiles!) so I hunted around for a tart tin but the only thing I could find was this dingy sized pyrex dish which would have made a half decent glass bottomed boat! Kept looking . . . muffin tray? Maybe, could make 12 mini pies . . . kept looking and found a rather dinky pyrex dish, not exactly the tart tin I was looking for but about the right size, the sides were too high but, mheh, yeah, I reckon it’d do, so I rolled with it.

Found some sugar for a stock syrup, and an egg . . . right ready for action!


ingredients (serves 6-8)
for the cherry pie
375g flaky pastry (1 pack / pre rolled)
400g cherries (stoned)
400g stock syrup (200g sugar & 200g water)
250g mascarpone cheese
300g chocolate spread
1 egg
4 sheets (gelatine)
1/2 lemon (juiced)
3 star anise (optional)
pinch of cinnamon


for the garnish
soured cream (something sharp, to complement the sweet tart).


apparatus / equipment
22cm pyrex dish
pastry brush (or a bit of kitchen towel works well)


method - quick version 
Blind bake the pastry @ 180C for 20min. Seal it with beaten egg.
Mix the chocolate spread and mascarpone cheese until smooth and spread it onto the pastry for the bottom layer.
Soften the stoned the cherries in a stock syrup and infuse with star anise and cinnamon for at least an hour.
Once infused, strain, and place the cherries on top of the chocolate to create the middle layer. 
Add gelatine to the syrup, reduce by 1/2. cool and pour over the cherries. Allow to set.
DONE!


method
This is so simple! That’s what makes this cherry and chocolate tart even better. Turn the oven on to 180C.

Butter the pyrex dish, and unroll the pastry onto it. Lift the edges so the pastry can be pushed right to the bottom without tearing. (specially if it’s deep) I reckon a loaf tin would would work too. It would result in more of a terrine style pie.

At this point I’d normally line it with baking paper, and add some ceramic balls to blind bake the pastry. But, as I said, I was doing a bit of free styling in an unfamiliar kitchen. So no baking balls!! I did brush the pastry with a beaten egg though to water proof it from the filling. Bake for 20mins @ 180C


While the pastry is in the oven, put the water and sugar into a sauce pan and put it on full on the hob. Add the star anise and the cinnamon. While that comes to the boil, wash and stone the cherries. Add them to the boiling syrup (taking care not to splash yourself) and as soon as it’s back up to the boil take it off the heat.


Put the gelatine into some cold water, leave it for 5 mins then squeeze it of excess water and add it to the syrup.

Next, mix the mascarpone and the chocolate until you have a smooth and creamy chocolate pate.


Spread the mix into the bottom of the pastry lined dish. Then sieve the cherries, keeping the syrup, and place them on top of the chocolate. Then put the whole tart in the fridge to set. (Best to cover it in cling film so it does’t take up any weird flavours like kippers or blue cheese)


Reduce the the syrup by half, then add the lemon juice, allow to cool and pour onto the tart. (after removing the cling film obviously) Return to the fridge to set.


to serve
Once set, cut into slices and serve as is, or with a scoop of soured cream, or maybe a lemon ice cream

Sooo good! So so good!

thinking ahead
You can make this a few days in advance and keep it in the fridge no problem.


what could go wrong? (notes)
“I tried to warm up my portion of tart” - DO NOT do that unless you want a pool of chocolate sauce with a bunch of angry cherries looking up at you!! Last thing you want!

“My gelatine turned into gloop and I could’t get it out if the water!” - Soak the gelatine in COLD water NOT warm water.


techniques used
Patience (required for the setting of the tart)


variations
I reckon this would be pretty good with a mix of soft fruits, strawberries, blueberries etc
Use agar to make the veggie version of this, or reduce the sauce a little more and don’t use a setting agent at all!!

ENJOY!!

Saturday, 24 May 2014

Recipe: Coconut & Cointreau Sorbet


This is one of those recipes that makes you look good, for very little work indeed! It has an amazing combination of flavours, and it's a really light finish to a meal.


Extract from the Movember Cook book which
you can get here: Cook Like A Man - Movember


ingredients (serves 8 x 70ml)
for the sorbet
130g caster
250ml coconut milk
150ml coconut juice
1/2  lime (juice & zest)
50ml cointreau

for the garnish
small mint leaves (tip of mint plant)
lime zest

apparatus / equipment
ice cream machine or 
food processor

method
sorbet
Put all the ingredients except the lime and the cointreau into a pot on the hob. 
Turn on to a medium/high heat and stir until the sugar has dissolved.
Take off the heat and allow to cool completely. Then add the lime juice and the cointreau, and mix them in thoroughly. 
Put the mix into an ice cream machine and follow its instructions. 
If like me you don't have an ice cream machine, freeze the liquid in a couple of ice cube trays. It will separate into 2 layers, pop out the sorbet cubes and put them into a food processor, run the motor until you have a slush puppy consistency. Refreeze immediately, in a tupperware box.

to serve
Serve in a decorative cup or a martini glass, put a couple of good sized scoops in.
Sprinkle a few zest strands onto the sorbet.
Pick the small leaves from a mint plant and place one in the centre of each sorbet.
Serve immediately!

thinking ahead
Best to make this in advance; at least one day in advance! It takes quite a while to cool and longer to freeze!

Why not try it with a raspberry liqueur

Saturday, 26 April 2014

Experiment Recipe: Shin of Veal


After 6 months being bounced around from one place to another, I've finally found somewhere I can cook!! You have no idea how much that means to me!! I didn't until this week! To be able to cook in a kitchen without being frowned at for one reason or another, gorgeous aromas emanating form my sauce pan or stock pot . . . hmmmmm; I have to say, it's nice to be able to get back to experimenting in the kitchen, vey nice indeed!! 

On that note here's and experiment I did the other day, with what looked like a rather large lamb shank, actually veal.


As you can see from the components (carrots, cabbage, potatoes), there's lots of very standard things in this experiment. It's is really about the veal shin, and how is comes out after braising. I've treated the rest of the accompaniments very simply. So if worst come to the worst, we've got some nice veggies and things to eat, think I might make a giant yorkshire pudding too, you know, just in case!! He he . . . 


Now that's a yorkshire pudding!! (The pyrex dish is 12" long)

ingredients (serves 4) 
for the veal & gravy
2 shin of veal (seasoned and seared brown)
3 onions (charred)
1 leek (cleaned and cut unto 2cm lengths)
2 star anise
2 chicken stock cubes
2L water
4g flavoured salt

for the carrots
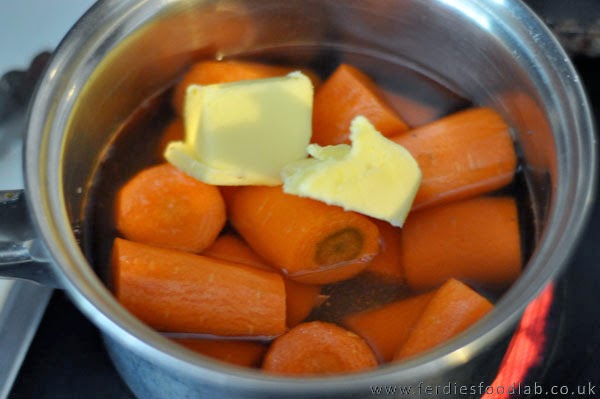
4 carrots (pealed, and cut into 1/3's)
50g butter
1 tsp flavoured salt 
2 star anise

flavoured salt
300g salt
1 tsp smoked paprika
1/2 tsp garlic powder

for the savoy cabbage
1 savoy cabbage (outer leaves off, but into 1/4's)


for the potatoes
8 medium desiree potatoes (cleaned, 1/4's skin on)
or jersey royals at this time of year

apparatus / equipment
Frying pan.
Large braising pot.


method
veal
Coat the meat in a thin film of oil - so the salt sticks - then sear it in a pan to brown the outside.
Once browned put it in the pot where it will be braised.
Peal and halve the onions, then add a little olive oil to the same pan and put the onions in flat side down, cook on a medium high heat until the flat sides are charred, then add them to the pot.
Add 2L water, bring to the boil and set to simmer 3hrs


carrots
Put all the ingredients in to a small pan, bring to the boil then set to simmer for 30-40mins


flavoured salt
Measure the ingredients and then mix well until a evenly distributed seasoning is created! Job done!

savoy cabbage
Boil in salted water, drain, leaving it as dry as possible, allow it to let off steam on a tea towel. The leaves of  a savoy cabbage will are all crinkly and will carry a lot of water, you want that to be lovely gravy instead of water, so get them as dry as possible.
You don't want lots of water diluting the gravy . . . . eeeeuuuwh!!

potatoes
Boil them in salted water, a 1.5inch diced potatoes take approx. 6-8mins (after the water starts boiling) to cook. Depending on the size of course!

thinking ahead
Put it on at lunch time, it'll be ready for tea time with very little effort!

to serve
Put each thing into serving trays and let people help themselves!!


verdict - ahem I mean conclusion:
Gorgeous!! The the meat falling off the bone and the tendon was super soft and unctuous! I bought 1 shin to experiment with, but 2 would be better for 4 people. 

RECOMMENDED!!

Friday, 25 April 2014

Recipe: Yorkshire Pudding (Giant and Beautiful)


Yorkshire pudding is very high ranking in the comfort food arsenal. We are talking big big guns! It's a corker, it goes well with gravy, sausages, roasts and with jam!!

Super versatile and hot and cold!! 

Making a really good yorkie pud has always been a bit of a hit and miss affair for me so you can imagine my delight when I perfected this . . . . 


ingredients (serves 4-6)
for the yorkshire pudding
4 large free range eggs
4 tbsp of flour
200ml milk
salt & pepper
100ml veg oil or duck fat


apparatus / equipment
baking dish 20cm x 25cm should be at least 4cm deep. (made of pyrex or heavy gauge metal)


method

Turn the oven on to 230C - quite often that's max!! Crank it all the way to the top!!!!

I work in centigrade but often I'm trying recipes written in fahrenheit so I've created a table I keep it as a bookmark on my phone for use in the kitchen. I thought it might be handy so I put it up!!!


Put the fat into the baking dish and put it into the oven straight away!

Put the rest of the ingredients into a mixing jug and whisk until you have a smooth batter.

Wait until the oven has reached full temperature. 

Pull out the shelf with the baking tray on it, taking care not to spill the fat, and pour the batter into the centre of the tray.


Shelf at an angle, mix all in one end!!
Could be worse!
As it spreads out, the dish, and oil, should be hot enough so the batter starts to bubble straight away.

Pour in enough batter so that it's at least 1/2cm thick at the bottom.

Slide the shelf back in and close the door. 

DON'T open the door for at least 20min. 25-30mins really! 

Or until it's bulging out of the top of the oven!

Serve immediately!!


thinking ahead
If you making a roast the perfect time to rest your meat is while the yorkshire pudding is on!
Plate up the roast and serve the yorkshire pudding as soon as it's out!!


what could go wrong?
Hmmm, a few things: 

FAIL! Got stuck to the top of the oven!
Make sure you are at least on shelf from the top!


FAIL! Way too much batter, and tray not hot enough.
Make sure the batter starts to bubble when it hits the oil.


FAIL! Right amount of batter still not hot enough!
Make sure the sausages are heating up in the oven with the dish!

FAIL! Right amount of batter, not hot enough heat, and not enough thermal momentum in the tray . . .
place silicone on solid metal tray.

FAIL! result being a thick plank-cake! Sticky, not so bad if you like sticky!


variations
This a core ingredient for all sorts of things: Serving with a ribeye joint of beef, Mini Toads - Picnic Toad in the Hole, Yorkshire pudding sausage hats! (giant yorkies filled with Sunday dinner!! Hmmmm!)

RESULT! Mini yorkshires!

RESULT! Hot dog toad in the hole!

RESULT! Roast vegetable bake.

RESULT! Roast vegetable bake and beef and mushroom stew . . brilliant winter fare.

RESULT! Yorkies & Roast Beef with Horseradish 


RESULT! Brunch w/ Egg Yolk Yorkie


RESULT! Yorkies w/ Sausage and Gravy and . . . . oooh shivers of delight Roasties


ROAR!!!! 1ft Yorkie Bliss - Extreme Yorkie!

Wednesday, 29 January 2014

Meat Club (Secret Meat Business)


At the last sitting of the Guild of Beefsteak, also known as Meat Club our table was graced with forerib of Dexter

Beautifully marbled and aged for the best flavour . . . . .  stunning.

Seared before being roasted low and slow for 7hours until medium rare . . . truly amazing!

Hendrix also pitched in with amazing Beeftini . . . very smooth . . . lovely way to start the evening.

As the night drew in . . . 

A low glow set about the banquet hall and a palpable sense of expectation . . .

and Meat Club comensed . . . oh yes!


Well that's what I hear . . . 

45 day aged forerib (amongst other things) has been acquired for the next Meat Club.

Tuesday, 28 January 2014

Recipe: Mac 'n' Cheese (Macaroni Cheese - Rigatoni Actually)


Mac 'n' cheese is an uber classic! It was one of the first things I tried to perfect when I left home! It's a super comfort food, and so versatile. As far as the basics go all you need to be able to make are a béchamel sauce and to make that a simple roux. the rest is cheese, your favourite pasta and all manner of variations depending on your mood! It's great for incorporating leftovers and stands on the plate without need for accompaniment. In fact I suggested an accompaniment for this one and got a reet (I think that's a northern term I might be wrong) good re-educating from my Italian flatmate . . . . . You do not serve a salad with a mac 'n' cheese, that's a different course!!

The cheeses I used for this particular mac 'n' cheese - which make's it the mac daddy were these:


murgu - swiss from belp - raw cows milk
vintage gouda 3yr - dutch from het groene hart - pasturised cows milk
schneeflockli - swiss from rougemont - raw cows milk
munster - french from alsace-lorraine - cows milk


They were leftovers form a rather nice cheese board I put on just recently! (sacrilegious I know . . . but soooo goood!)

My flatmate liked the mac 'n' cheese, I chucked the salad out of the window while no-one was looking!! ; )  


ingredients (serves 6-8)

for the mac 'n' cheese
500g rigatoni / macaroni
300g cheese (grated) (your favourite - better to pick a relatively strong one)
4 tomatoes (diced)
2 onions (fine dice)
4 cloves garlic (fine dice)
2 tbsp dijon mustard
1 tsp cumin seed
50ml olive oil
1L water
100g butter
100g flour

Cheese: a nice mix that wont hurt the bank too much - Red Leicester, Parmesan or Gran Padano and Mozzarella.

for the topping 
200g mature cheddar (grated)

apparatus / equipment
stick blender (optional)

Hard to tell but this mac 'n' cheese is over a foot wide!!! 


method - the basic steps are as follows:
* Cook the rigatoni / macaroni
* Make stock for the sauce
* Thicken the sauce with a roux
* Add the cheese to the sauce
* Mix sauce and pasta
* Sprinkle with cheese and bake for 20mins @ 180C


here's how in more detail:
stock
Put 1L of water, the onions, cumin, tomatoes and olive oil in a pan and bring to the boil, then set to simmer for 20mins.
Once the stock is ready use a stick blender to make it smooth and pass the stock through a sieve. If you don't have a stick blender skip this step and go for an artisan style sauce personally I quite like it with a little texture!! Smooth is good too!


pasta
In a separate pan add 1.5L water and 1tbsp of table salt and bring to the boil. Once boiling add the rigatoni and boil for 7mins.

Worth pointing out here that this is undercooked. If the rigatoni was for meatballs for example, or another sauce to be served immediately 7mins wouldn't be enough!!  9mins would be al dente and 11mins would be soft. We want it undercooked because it's going to be in the oven for 20mins in sauce cooking more!! : )

But you can cook it longer if you want to have a softer mac n cheese. 


roux

Next make a roux to thicken the stock. A roux is a mix of flour and fat. This recipe is vegetarian so I'm going to use butter, but you can use most fats, veg oil, bacon fat, duck fat etc for different flavours.

Melt butter and add the flour, mix well, and stir continuously over the heat to cook out the flour.
Add a fifth of the stock and bring to the boil and mix it in to create a smooth paste.
Repeat: adding the rest of the stock to the mix a third at a time, stirring until you have a smooth and even sauce.


add cheese
Next add the cheese to the sauce, stirring until it's melted and completely dissolved in the sauce. Season it with salt and pepper. Then add the pasta and mix well.


sprinkle
Put the mix into an oven proof dish, sprinkle with grated cheese and bake for 20minutes @ 180C until it's golden brown!!


thinking ahead
This is a great dish because, it will last over night in the fridge and be easily reheated in the oven (or microwave if you insist!) and you can also freeze it with very little side effects. 


variations
Are you kidding the list is endless, it's a great way to use up odds and ends: Use a tomato based sauce and just top with cheese for a healthier version. Add aubergine caviar, or ham and oregano. A chicken based variation is also pretty good!! : )
As you can see I tried an avocado topping as an experiment, and although it didn't detract from the dish it was a bit like adding double cream to single cream - pointless!

Aubergine caviar mac 'n' cheese


Classic cheddar and chicken mac 'n' cheese

How To Book / Attend

How To Book / Attend
Fancy getting stuck in? Click on the image above and to see how : ) . . . hope to see you soon.

More Techniques, Basics and Corker Recipes

More Techniques, Basics and Corker Recipes
If there's something you've tried at ferdiesfoodlab or a technique you want to know about drop us a line at bookings@ferdiesfoodlab.co.uk and I'll put up a post about it!!